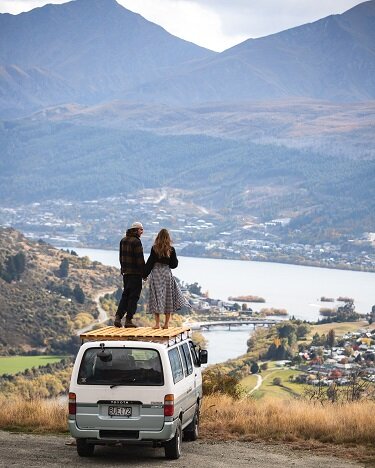
How To Build A Roof Deck For Your Campervan 2021. For Under $400!
Ever thought about putting a sweet as roof deck on your campervan? Did you look up what was available to purchase? We bet that’s as far as the idea got for most. Factory made roof racks and full length platforms are damn EXPENSIVE!!! We’ve wanted one for a long time but couldn’t find anything reasonably priced, even in the second hand market. Goose finally thought “Bugger it! I’m going to build my own! It’s only some bits of wood on top of some steel bars”.
After a few sleepless nights figuring out the design and researching materials available in our area, we went and grabbed the parts and cracked into it. Here’s how to build a cheap roof rack / roof deck that will fit any vehicle with rain gutters. No welding required!
Are you wanting to build your own van but don’t know where to start? Check out the Van Life Academy - a course put together by multiple vanlifers to make the process as seamless as possible for you guys!

Let’s Jump Into It!
There’s two main parts to the build - the ROOF RACKS that will support the deck, and the TIMBER ROOF DECK itself. Here’s a list of the parts that are needed, as well as links to what we bought. You might be able to find cheaper alternatives in your area so keep an eye out!
Materials:
Heavy Duty Angle Brackets for roof rack gutter mounts - 130 x 130 x 75mm Zinc Plated Angle Bracket x 8
Steel Bar for roof rack cross members and gutter mounts - 30 x 60 x 2.5mm Galvanised Steel Bar x 6metres
Anti Rust Paint for roof rack steel - Dulux 500ml Flat Black Metalshield Topcoat Epoxy Enamel Paint
Bolts & washers for roof rack gutter mount - Zenith M10 x 30mm Galvanised Hex Head Bolt And Nut x 16 // Zenith 3/8" Zinc Plated Spring Washer - 30 Pack // Zenith M10 x 24mm Galvanised Round Flat Washer x 16
Bolts & washers for roof rack cross members - Zenith M12 x 50mm Galvanised Hex Head Bolt And Nut x 16 // Zenith 1/2" Zinc Plated Spring Washer - 15 Pack // Zenith M12 x 28mm Galvanised Round Flat Washer x 16
Timber decking material - 3metre long pallets from Facebook Marketplace x 3 - sorry no link for this one!
Protective Oil for timber decking - British Paints 4L Oil Based Natural Decking Oil
Screws for timber decking - Zenith 10g x 50mm Galvanised Countersunk Head Metal Screw - 50 Pack
Grinding Disks - Flexovit 115mm Black Cutting Wheel x 2
Sanding pads - Bosch 100 x 140mm 40 Grit Sanding Sheet Set Multi Sander Wood & Paint - 10 Pack x 2
Tools Required (not included in build cost):
18v Cordless Drill & Driver - Ryobi One+ 18v Cordless Drill & Driver Set
Assorted Drill & Driver Bits - Ryobi Drill Driver Bit Set
Adjustable Spanners - Adjustable Wrench Set
18v Cordless Angle Grinder - Ryobi One+ 18v Cordless Grinder
Paint Brushes - 5pc Paint Brush Set
18v Cordless Sander - Ryobi One+ 18v Cordless Sander
Hammer - Claw Hammer
Pry Bar - Prybar / Nail puller
Metal File - Metal File Set
Optional Extras - coming IN Part 2 of the roofdeck build!:
Ladder for easy access - We found a cheap second hand steel ladder on Facebook.
DIY Solar Shower - Black PVC Tube with hose outlet and spray gun. Maybe a bike tyre valve to pressurise.
Awning - Cheap ‘bag’ type awning or fancy wind out version?
LED Lighting - Flood lights to light up the area for night time activities or driving trails in the dark.
Solar Panel - This will be done as part of our electrical build, but will be mounted to the roof deck.
The Build
There’s nothing too difficult or complicated about this project. We’ve aimed to make this write up as simple as possible so everyone can benefit from it and create their own Roof Deck. Follow the basic steps below and you’ll be chilling up top watching the sunset in no time!

Here’s all the the components (minus the other washers) that go into the Roof Rack. There’s really not much to it!
Step 1: Cut the Steel Bar for the Roof Rack Cross Beams.
We purchased a 6m length of steel that was faaaar to big to fit in the van, so got it cut in half to bring it home. With Ellen’s help, we held the angle brackets in the gutters of the van and figured out that 1.4m was the perfect length to cut the cross beams at. This gave us a big enough offcut to use for the gutter clamps later, so hang onto the extra pieces! We measured to length and used our angle grinder with a metal cutting disk to cut the steel.
TIPS: Get at least 2-3 grinding disks, you’ll burn through them pretty quickly // Be careful of the freshly cut edges on the steel, they’re razor sharp! Use a metal file to take off the burrs.
Step 2: Drill the holes to attach Angle Brackets to Cross Beams
The angle brackets we purchased had pre-drilled holes and are rated to hold 200kg each. We made the most of the existing holes and used them to mark out where to drill into the steel cross beam. Using a 3mm drill bit, we drilled a small hole to make it easier for the larger drill bit to cut through. We then drilled it out with a 12mm drill bit to match the holes in the angles brackets and will be using 12mm bolts to attach the brackets to the beams.
TIPS: Clamp your work piece tight to hold it in place. Larger drill bits can grab when drilling into steel . . . your knuckles will thank me for it // Keep the drill as straight as possible to ensure the bolts go in straight and easily.

Cross beam bolted to the angle bracket for a quick mock up
Step 3: Creating the Gutter Clamps
We need to make a ‘C’ channel that’s going to hook under the gutter and then bolt to the angle brackets to secure the rack in place. Go grab the offcuts you have of the steel bar and lets cut them into what we need! We trimmed the 100mm long offcuts to 75mm to match the width of the angle bracket, and then cut it in half along the narrow edge to give us a 75 x 50mm C channel. Now to drill the holes for the bolts. With the angle bracket having an existing hole in the right spot, we marked where that was onto our C channel, then flipped it to give us the position for another hole on the opposite side. We pre-drilled the holes with the 3mm drill bit before using a 10mm to drill it out the the size of the hole in the angle brackets.
TIPS: Sit the angle bracket in the gutter and hold the C channel with one lip underneath the gutter to mark the holes in the right spot. It needs to sit lower to allow for the thickness of the gutter // Now’s a good time to test fit all the racks to make sure they fit nicely.
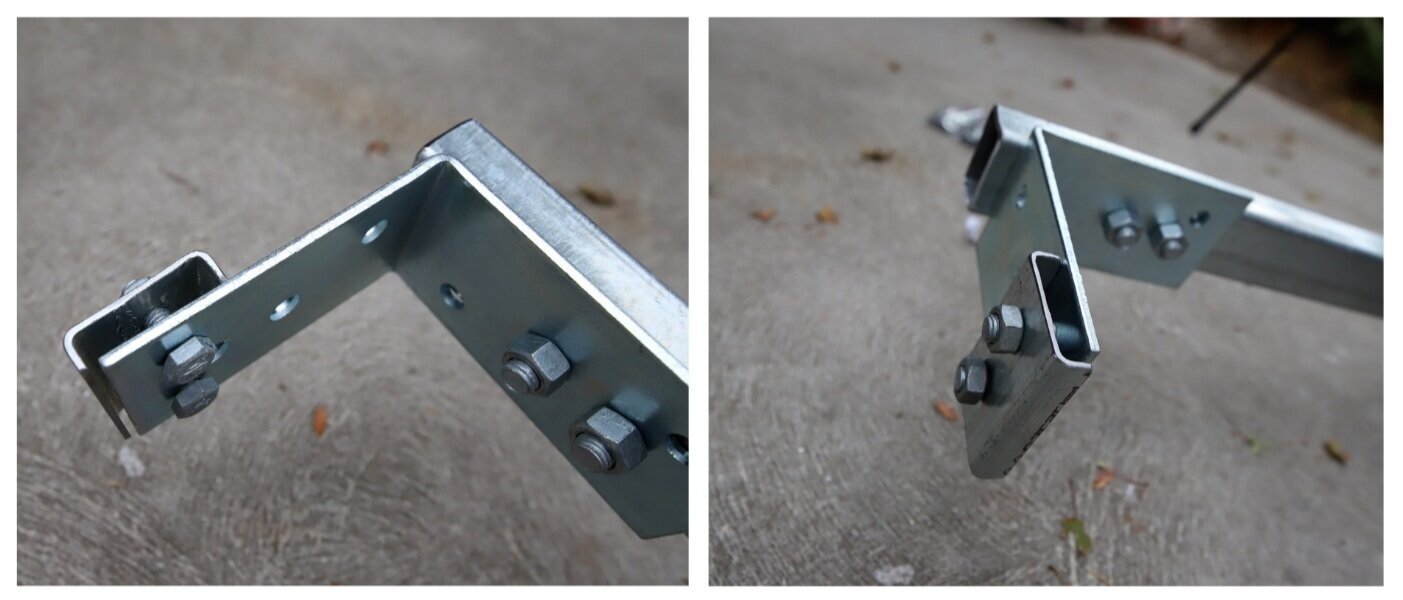
Here’s how the gutter mounts look quickly put together. It’s a simple idea that works perfectly!
Step 4: Painting the Roof Racks
There’s two reasons to paint the steel parts of our Roof Deck - 1. It adds another protective layer against the elements and prevents rust, all the metal parts are already galvanised as an initial preventative. 2. It makes it look better. Any colour as long as it’s black right?! We used Dulux Metal Shield Epoxy Enamel that ‘doesn’t need an undercoat or primer’ . . . While it did stick to the steel, it’s pretty easy to scratch off and didn’t give the best finish. We gave everything 2 coats and were okay with the results.
TIPS: Use an undercoat or primer for every painting project // I personally prefer to use spray paint to brush/roll on paint. I find I get a much cleaner finish with less runs or blobs etc.
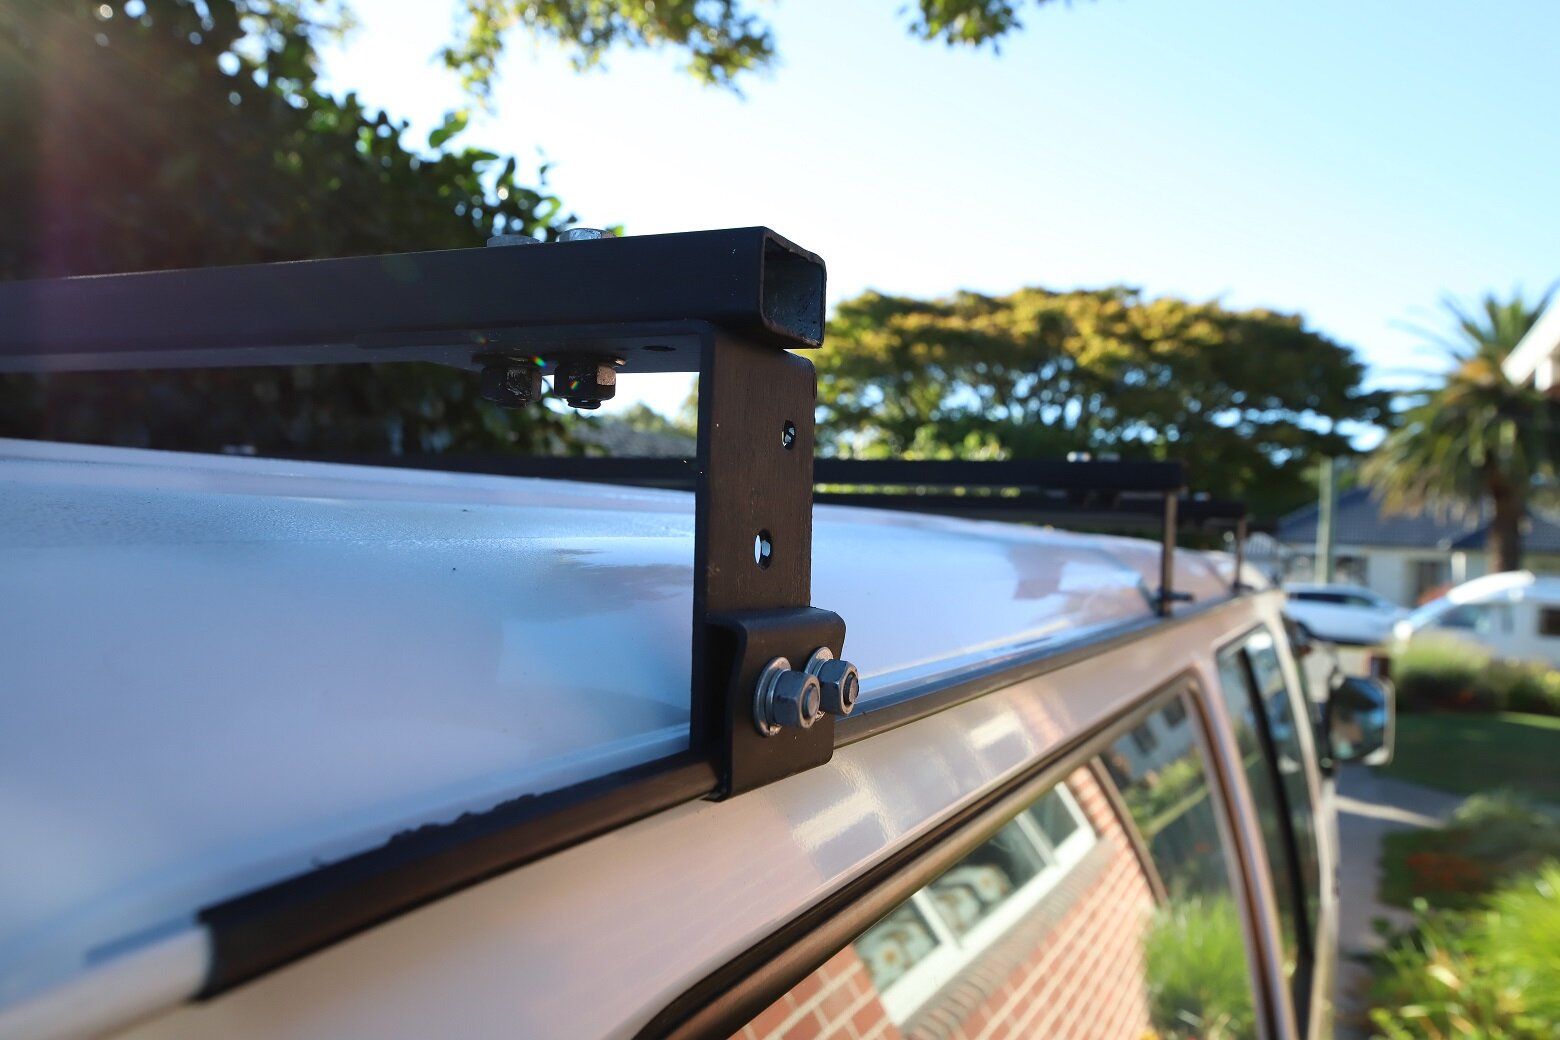
Once the paint was dry we reassembled the components and bolted the Roof Racks to the roof. We didn’t want it coming off so we tightened the hell out of it, look at the steel bending!
Step 5: Pallet Preparation for Timber Roof Deck
We originally looked into standard pine decking from the hardware store for our Roof Deck. The average price we came up with was around $150 for what we needed so we looked around to see if we could do it cheaper. Luckily there were some 3metre long pallets on Facebook marketplace for an alright price so we grabbed them. The idea was to pull the pallets apart and use the boards as our decking material, but after bashing at the pallet supports for a while and breaking most of the boards I touched, we needed a plan B. We decided to put the pallets up as is and cut down as much of the pallet supports as possible to remove weight.

We’d quickly run out of useable boards if we kept trying to separate them. Sitting the side by side would be the easiest and would work fine.
First we slid the pallets up on the roof for a test fit. They’re approx 800mm wide so two side by side was a little too wide for our roof. We cut one board off on pallet (yes this meant the join wasn’t in the centre of the van and yes my OCD is killing me) to make the overall width work. We also needed to notch out the underside of some of the boards so they don’t sit on top of the bolts holding the Roof Rack together.
TIPS: If you have a bit of extra cash or don’t have much time to complete the project, buy new timber! It’ll save you days of sanding!
Step 6: Sanding the Timber Roof Deck
It’s safe to say that sanding down the pallet boards was the worst part of this project. The pallets were pretty rough so needed a good cut back to a smooth surface. I spent a good couple of says just sanding these damn things. As above, buy new if you can to save time! We used some 40 grit sanding pads on our 18v sander to get rid of the worst parts quickly.
TIPS: Avoid sanding at all costs! It really sucks hahaha

Step 7: Sealing and Weatherproofing the Timber
The pallet we used was most likely already treated to protect it from the elements, but as you can see from the old untouched boards, they go silver over time. The sanding revealed nice fresh timber that would eventually look exactly like it used to before too long. We wanted to protect the wood and also add a little colour to it, so we chose to use a protective oil. We purchased British Paints 4L Natural Water Based Decking Oil which was easy to use, gave us a good final finish and was easy to clean up being waterbased. Applying it to the underside first gave us runs and drips down onto the good face we just sanded . . . So this needed to be re-sanded as it would give us horrible darker patches all over the top of our deck.
TIPS: Be careful applying the oil to the edges of the timber to minimise overrun // Use a good amount of oil as it soaks into the timber

Here’s the underside of the Roof Deck Timber after applying the protective oil. 2 coats on the left, one on the right.
Step 8: Mounting the Timber to the Roof Rack
Here it is, the final step to finish of our basic DIY Roof Deck! All we needed to do now was throw the pallets back up on the Roof Racks and secure them down. We started out not drilling any pilot holes because we were using self drilling metal screws, but after snapping a few we quickly decided to drill a 3mm hole first to make screwing down easier. It was honestly solid enough with screws only in the corners of the pallets, but for aesthetics and piece of mind we put a screw in every board where it sat on the Roof Rack beams.
TIPS: Predrill every hole into steel! // Take extra time to remove any metal shavings off the van roof. These will leave orange rust spots EVERYWHERE if not cleaned up.
That’s It! we’re Done!
We’re pretty stoked with how the Roof Deck has turned out. It’s completely functional, was relatively simple and most importantly, was relatively CHEAP TO MAKE! We’re not quite finished with the projects up top though - We need to add a ladder to access it easier, an awning, a solar shower, a solar panel and maybe even some LED spotlights. Why the hell not hey?! Stay tuned for more updates on the Roof Deck, as well as the Full Custom Campervan Conversion of our second van coming soon!


Before you go, you might also like….
How To Install A Solar Set Up.
Like what you see? Pin it for later!
